Search
Latest topics
Learn how to make an avatar!
2 posters
Page 1 of 1
 Learn how to make an avatar!
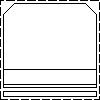
You don't need any fancy shmancy (expensive) paint programs to create quality avatars. You can make them on Paint. All you need is a background picure and and avatar template. You can make your own avatar template on Paint or you can use one from my stock here. Remember: If you're gonna use any of my templates, or any of my graphics for that matter, you MUST link me.
Required Programs:
1.Microsoft Paint
Step #1: Find background-image for your avatar
Find a picture off the web that you want to serve as the background for the avatar. Save it your computer by right-clicking it and choosing "save as". You can just as well create your own picture. Also make sure you have an avatar template saved to your computer. You can find some here. The most common sizes for avatars is 50x50 pixels, 65x65 pixels, and 100x100 pixels. Mine will be 100x100.

Step #2: Open your Image in Paint
Open your background picture in Paint. My background image is shown below. <b>Note: It is important that your background picture is at least 100x100px if your using a template that is 100x100px.</b> If you must, go to Image > Attributes and change the width to 800 and height to 600 so that you have enough workspace.

Step #3: Using the "Draw Transparent Image" Tool
Make sure the "draw transparent image" button is selected. I have to bold this because everyone keep skiping this step, if you don't know what the "transparent image" button looks like here it is:

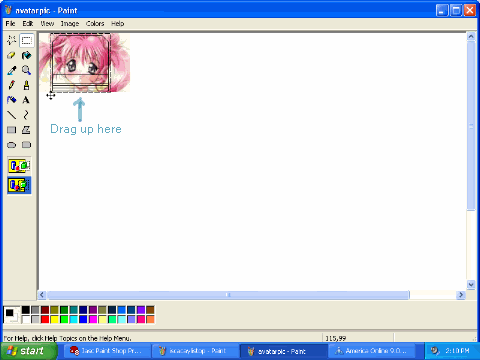
Now go to Edit > Paste From and in the browser, search for your avatar template. Select it and then click Open. The avatar template should appear in your window now. Drag the template over the background image like so:

Step #4: A Little Editing
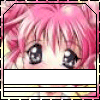
Now do the necessary erasing. Erase the part of the picture that's outside the avatar template and also erase the little rectangular banner through the middle. The avatar should now look something like this:

Step #5: A little more editing
All that's left to do is a little editing. If you want you can fill the bands in the middle with a color that matches the avatar. For my avatar I'll fill it with pink. Afterwards, insert your text. Here is the end result.

When you are ready to save, make sure the avatar is as close to the top left corner as possible. Using the selection tool, make a selection around the finished avatar and drag it to the top left corner of the work space. Next go to Image > Attributes. If your avatar is 100x100px then type 100 next to width and height. If your avatar is 50x50px then type 50 next to width and height, and so and so forth. Click ok. You just cropped your image! Save it in .GIF format and you're done!!!
Required Programs:
1.Microsoft Paint
Step #1: Find background-image for your avatar
Find a picture off the web that you want to serve as the background for the avatar. Save it your computer by right-clicking it and choosing "save as". You can just as well create your own picture. Also make sure you have an avatar template saved to your computer. You can find some here. The most common sizes for avatars is 50x50 pixels, 65x65 pixels, and 100x100 pixels. Mine will be 100x100.
Step #2: Open your Image in Paint
Open your background picture in Paint. My background image is shown below. <b>Note: It is important that your background picture is at least 100x100px if your using a template that is 100x100px.</b> If you must, go to Image > Attributes and change the width to 800 and height to 600 so that you have enough workspace.
Step #3: Using the "Draw Transparent Image" Tool
Make sure the "draw transparent image" button is selected. I have to bold this because everyone keep skiping this step, if you don't know what the "transparent image" button looks like here it is:
Now go to Edit > Paste From and in the browser, search for your avatar template. Select it and then click Open. The avatar template should appear in your window now. Drag the template over the background image like so:
Step #4: A Little Editing
Now do the necessary erasing. Erase the part of the picture that's outside the avatar template and also erase the little rectangular banner through the middle. The avatar should now look something like this:
Step #5: A little more editing
All that's left to do is a little editing. If you want you can fill the bands in the middle with a color that matches the avatar. For my avatar I'll fill it with pink. Afterwards, insert your text. Here is the end result.
When you are ready to save, make sure the avatar is as close to the top left corner as possible. Using the selection tool, make a selection around the finished avatar and drag it to the top left corner of the work space. Next go to Image > Attributes. If your avatar is 100x100px then type 100 next to width and height. If your avatar is 50x50px then type 50 next to width and height, and so and so forth. Click ok. You just cropped your image! Save it in .GIF format and you're done!!!
 Re: Learn how to make an avatar!
i do other things on microsoft word and make them a bit different...

Guest- Guest
 Re: Learn how to make an avatar!
Well, that's how I know to mwke themflare2014 wrote:i do other things on microsoft word and make them a bit different...
 your Template
Im using ur template kk..

Trey-sensai- Academy Student

- Number of posts : 1
Registration date : 2008-05-17
Page 1 of 1
Permissions in this forum:
You cannot reply to topics in this forum
 Home
Home Portal
 Gallery
 Register
 Log in


» Kimimaro Image contest
» Sound Gallery
» Short Bios
» Akatsuki Gallery
» The clan's rules
» Post your Naruto drawings here
» Rate videos
» Post videos here
» Most hated characters